

Showing posts with label handmade. Show all posts
Showing posts with label handmade. Show all posts
Friday, January 12, 2018
Klimt-Inspired Veneer...a Step Along the Learning Curve ...
I think I'm nearing the end of the road on this veneer, and learned a simple technique for finishing the sides better, using a hair's breadth layer underneath, then burnishing to round the edges. No great secret but I have rarely worked right up to the finish line without curing the clay before, and certain "refinements" are more difficult after the fact. I didn't use the technique on the outer perimeter of the pendant because I had already veneered it, and didn't want to sacrifice it.
 COOL HINT: I don't know why it never occurred to me before because I use them all the time for all sorts of things, but 3 hole page protectors are a fabulous place to store veneers! I found this hint on a post from 2011 yesterday, and even then "everyone" knew about it.

Friday, April 29, 2016
Undisclipined Me
I keep meaning to be more regular in my posting, but so many things, many totally useless, keep getting in the way. So I will start where I am, and bounce around in time as necessary until I'm back In the NOW.
I've been working on leaf and ink techniques lately, inspired by a technique described by Page McNall. I only went about halfway with her process, but got all involved with the needle carving/drawing and then of course "painting" either with paint or alcohol ink or both.


I've been working on leaf and ink techniques lately, inspired by a technique described by Page McNall. I only went about halfway with her process, but got all involved with the needle carving/drawing and then of course "painting" either with paint or alcohol ink or both.

She's on Flickr
I've done several, but the most current, now in progress, are these, destined to be earrings, done on copper leaf. All are still in progress, so will no doubt be tweaked before I'm done.


Wednesday, December 4, 2013
Choosing Six ...
Several friends and acquaintances have suggested or asked that I offer a choice in my notecards, so I spent the day setting up the first 18 to allow exactly that. I like the idea because, since I print to order anyway, it isn't much more complicated to do this for people, and it will tell me over a few months which people respond to most. I have dozens and dozens of cats so it's good to know.
I really enjoy doing this, though I will admit I'm looking forward to getting back to creating new works on a steady basis.
https://www.etsy.com/listing/171846059/choose-your-mix-of-six-from-18-cat?ref=pr_shop


I really enjoy doing this, though I will admit I'm looking forward to getting back to creating new works on a steady basis.
https://www.etsy.com/listing/171846059/choose-your-mix-of-six-from-18-cat?ref=pr_shop


Tuesday, April 24, 2012
Cedar Faux Ivory Cigar Box

Thursday, March 29, 2012
My Cat Bookmarks and Polymer Clay Daily

Tuesday, November 8, 2011
Autumn Beads .. Soon I'll Hear Old Winter's Song ...

Wednesday, November 2, 2011
This Week on the Worktable

For myself more than anything, I have started to take a few snaps of the week...on days when I feel as though I'm accomplishing nothing, maybe this will encourage me.
Sunday I made a bunch of stacks, some, not yet cut into, shown. Each day since (3 so far) I've taken a stack and done something...
A couple of the stacks are really ugly but marbelized into yummy burgundy and port pieces ....
Will have to see where the rest goes.
Am eyeing the bits lower right that might go with vintage Italian millefiore glass beads.
One bunch, not shown here coordinates gorgeously with unakite.
Saturday, October 29, 2011
Hand Carved Artifact Bangle Bracelet

I loved making this bangle as well as a number of others using similar techniques. I built the mosaic on a simple bangle base; tiled inside and out for comfort and strength. The textured tiles are patterned from an original design of my own, and are accented with circular tiles and small individually made balls. The piece has been glazed with a burnt umber-burnt sienna glaze.
The inside is also tiled and signed. The interior diameter is just at 2 3/4 inches, medium to medium-large in size, and the width of the bangle is 1 1/2 inches.
It is currently in my Etsy shop.
Wednesday, October 26, 2011
Square Bling Mosaic Bangle

Another bangle, using some of the grout sticks (thank you Laurie Mika) from my tessarae box along with several hand-painted squares, on a SQUARE black bangle with gold and silver leaf channel edges. Soon to be in my etsy shop.
Very blingy...can't capture the sparkle.
Tuesday, October 25, 2011
Blue Currents Mokume Gane Earrings

Very thin, ultra-lightweight slivers of silver and blue(s). Buffed, polished and glossed on the front, the back is deliberately left somewhat "unfinished" which feels to me like a bit of exotic shell.
Overall length about 2 5/8"; drop 1 3/4"
Monday, October 24, 2011
Tidal Blues Bangle Bracelet

Not exactly leftover scraps, but I had been fooling around and came up with this mixture and then didn't know what I wanted to do with it. After making a couple of pairs of earrings (not yet photographed) and a small pendant (ditto) I decided, being on a bangle binge and all to make this ......
Sunday, October 23, 2011
Tiny Squares Mosaic Bangle

As the year approaches its end, I have felt the need/desire to use up as many of my little bits that I felt to interesting or pretty to mush up. This is another bangle designed to help in that quest.
The piece is made entirely of polymer clay, tho' tiny bits of leaf are evident here and there. The squares were built on a cured polymer substrate.
Marbelized Bangle

I love working with leftover bits and peices and know many of us do. This bangle reminds me as much of marbelized paper as anything.
The piece is made entirely of polymer clay; the scrap mokume gane added to a base bangle.
Thursday, August 18, 2011
Playing with Cats . . .
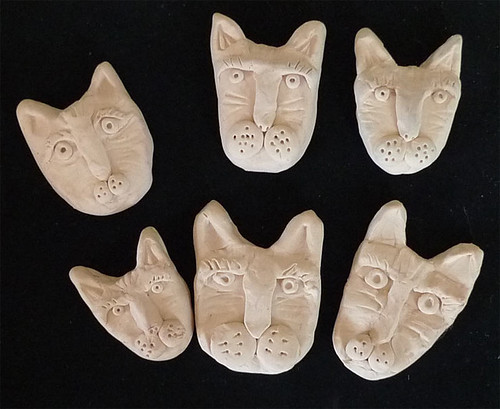
I've only done one piece featuring a cat, but know that sooner or later I must find a way to add more of them to my clay work.
I think I will my hand at making some molds and see where, if anywhere that takes us (the cats and I) No matter what happens, or doesn't, this is fun!
Saturday, August 13, 2011
Rosy "Ivory" Bangle

Photographing items is often amazingly revealing. I had thought this piece was complete yesterday, after color washing and buffing, but when photographed this morning, I found it just wasn't quite "right", so back to some 320+600 sanding and a lot of buffing on my jeans while I watched part of a really bad movie and did some extra loving on Miles our neurotic but beloved Siamese.
So, now it is finished, looks good on, and is ready to join the coordinated necklace, once I get the toggle finished. (Forgot to colorwash the two beads yesterday when doing the bangle).
Blue "Ivory" Bangle ... Complete!

I was very nervous about starting the color wash on this bangle as I liked it so much as it was. Wouldn't have done it except for a bit of aging had I not wanted a piece to coordinate with the necklace I made this for.
Happily it turned out well...in fact I love it.
This bangle has opened my eyes/mind to all sorts of possibilities -- cannot wait to continue on.
Friday, August 12, 2011
Two Antique "ivory" Bangles in Progress

.

I must say I really like the bangles just as they are (with some finishing yet to be done). However, they will be color washed to coordinate with the two necklaces nearly finished. Like many artists, I tend to work sequentially, so no doubt "unwashed" pieces are in my near future.
Friday, July 29, 2011
Almost There . . .

In some ways this box took control of itself somewhere along the way and morphed into something slightly different...voyage of discovery in terms of design and technique. I’ve enjoyed the journey.
Now just some final tweaking here and there...cleaning up the tiny bits of claydust in the gazillion crevasses and then some final buffing and perhaps a tiny bit of wax or polish here and there.


Day 6: Coral-copper/gold striated veneer applied to center motif......crisis! While the colors looked fine together I expected the coral to deepen more than it did in curing and simply didn’t care for it. After a day of looking at it.....
Day 7: Dremel Stylus to the rescue ....not only did the carving dilute the strong color contrast, but I found I loved the element of additional texture
Friday, July 22, 2011
July 22 2011 Cedar Box in Progress


Day One: Cedar box, gessoed black and incised with Dremel Stylus to establish overall design.
Day Two: Top covered in Polymer Clay (using old fashioned Terra Cotta school clay) at various thicknesses to establish dimensions of design. I then textured the “cross” motif with a ball tool, and incised the outer “frame”.
Days Three & Four: The sides were covered (two each day) in the same manner as the top.
Day Five : The textured areas were antiqued with straight black acrylic paint, forcing paint into the grooves and divots, then wiped.
Then the center motif was dry brushed with a mixture of metallic gold, copper, green and black. Three very light applications were done to achieve sufficient contrast with the outer area with was simply wiped.
Next I will apply polymer clay veneers to the "raw" terra cotta areas and set stones, most likely turquoise, in the centers of the motifs.
Subscribe to:
Posts (Atom)